Pages

Wednesday, 18 April 2018

Measure Once, Knit Twice


Has this happened to you?  The front and back of a sweater, or the two sleeves are different lengths? Or, proud to have finally completed that pair of socks only to discover that one is longer than the other.  Sure it has, come on, admit it.

It has happened to all of us at one time or another.  Why? Probably because we measured once, and now we get to knit twice.  Otherwise, find someone that has one arm longer than the other and give the sweater to them. 


We need to measure many things in knitting, not just the length.  For example, we measure our bodies, the size of our needles, and the gauge of our knitted fabric.  Notice I said “knitted fabric” instead of swatch.  I must admit, sometimes I am so excited to start a new project that I start knitting, then do the gauge measurement.   When it’s off, I cuss a little, rip it out, change my needle size, and swatch like I should have done in the first place.  Perfect example of measure once, knit twice.

Recently, I discovered yet another metal gauge ruler in my many tool bins, and thought to myself, “I wonder how many I have”?  So I collected my knitting measuring devices together and realized that I have a bit of a tool stash. 


Interesting point about the 4mm needle sizing, gauges typically say either 4mm or 4 1/4mm, but the white plastic one that I have, has both sizes.  The purple KnitPicks ruler has a magnifier, which is very helpful when trying to count stitches for gauge, while the Susan Bates metal ruler has a 2”x2” gauge cut out. 

With all these rulers at my disposal, I tend to carry one of the metal 6” gauge rulers, and my 36” Four-Fold Rule in my knitting bag.  That is the politically correct term for what used to be called a Blindman’s Rule; named for the large numbers which make is easier to read.  I must say, I do like the large numbers.  It also requires that you have your work on a flat surface to measure; always a good practice.  I only use the measuring tape when measuring body parts or around corners.  I highly recommend getting a buddy to do the body measurement; it’s a lot more accurate than you can do on yourself.  You can do the corner by yourself, sometimes.    

 
When the work is longer than 36”, like an afghan or warping the Knitters Loom, I pull out the big gun.  Yup, the 16’ retractable measuring tape.


I was recently introduced to another tool for measuring gauge … The Swatch Ruler.  It sticks to the fabric so you can easily count your stitches and rows.  If it only had a magnifier, I would be all over it and add it to the collection.


One perplexing measurement that I find when knitting, is the button band.  Patterns often state, “knit until slightly stretched, measures the front”.  I have yet to figure out how much stretch is considered slightly.  This, I do not measure.  Instead, I count rows.  Better yet, knit the band with the front pieces.  That way, there is no guessing or counting.  I also count rows for my socks, sleeves, fronts to backs, etc.  Whenever two pieces are supposed to be the same length, I count rows.  That sounds a bit anal retentive, but it works.  Now, if I could only remember to write down the count from the first item before starting the second.  That way, when my husband starts talking about the temperature or expected snowfall, I will have a reference point and not have to start over.

The term “Measure Twice, Cut Once” is generally associated with the carpentry trade, but in a figurative sense, it also applies to knitting. An excerpt from the Historically Speaking website states that the term can also be meant as a warning to plan and prepare for something in a careful, thorough manner before taking action.  So let’s make this our knitting mantra, Measure Twice, Knit Once!

If you diligently measure twice and still find that one sleeve is longer than the other, then you have no one else to blame.  It must have been the wine.

Wednesday, 11 April 2018

Fantastic Beasts and Why We Knit Them


Have you ever had the urge to make a soft toy for that special someone?  They are adorable and you think, “Oh my God!  They are so cute, and well, it shouldn’t take very long.”  It may not, depending on what you choose to make. 

For my first time project, I purchased a kit from a vendor at the Creativ Festival some 13 years ago, to make for our first grandchild.   This included all the bits of yarn and embellishments needed to create a bunny rabbit with a carrot.  Since I had previously made dolls, and had knitted the clothing for them, I thought, “OMG. It is so cute and it shouldn’t take very long!”  Perhaps that would have been true had I selected a simpler project. 


Every individual aspect of the bunny was a knitted piece that needed to be sewn together.  The yarn, with the exception of the carrot, was a snowflake type yarn; not the easiest to knit with in the first place.  It is good for concealing little flaws that happen along the way, and does make for a very soft finished product, which is great for baby. Prior to giving it away to our new grandson, we would carry it around the house and place it on a chair in whatever room we were sitting.  For all the fussy and time consuming work that went into it, I had to admit, it was extremely cute, but was not likely to make another any time soon.  It was a labour of love.  I did buy another kit a couple of years later to make a Teddy Bear for our second grandchild.  To this day, the kit is intact in a storage bin, somewhere. 


This past Christmas, I decided that I would make it easier on myself by purchasing a Sock Monkey from my friend Liz, and knitting a sweater to match the Entrechat (by Lisa Chemery) I had made for my great niece.  Liz does an amazing job of making these monkeys, all with Canadian sourced materials.  It took no time at all to make a sweater and hat for the monkey, and Christine decided that it should have a pom pom.  So she made one. OMG, they were both so cute, and really, it took no time at all by comparison to the bunny.


Recently, a member of our local casual knitting group (aka the Flock), was going to be celebrating a significant birthday.  Liz came up with the wonderful idea of making a Donkey for Judith, as this is the name she affectionately calls her husband. What a great idea!  We are all on board.  Brigit found a pattern on Ravelry of a Donkey and Unicorn by Steffi Hochfellner.  OMG, they are so cute!  As a group, we can make the pair for Judith and Donkey. It shouldn’t take very long.


And off we go.  Brigit buys the pattern and we get together with our left over bits of yarn to select our colours.  The pattern calls for a DK weight, but we went with Worsted as that was the best source for our colour bits.

Well, as group projects go, the group ended up consisting of Linda and me.  She took on the Donkey, and I the Unicorn.  By comparison to the bunny, this was a much simpler project, however, still fussy, with lots of ends to sew in due to all the colour changes.  We both found that we could only work on it for so long before pouring a glass of wine and switching to a “real” knitting project.  We got together once a week to work on the critters, and I have to admit, we would gripe a little about how fussy it was; where was the group when we needed them, and so on. 

It wasn’t long before our griping turned into “OMG, they are so cute!” Pretty soon, the heads were stuffed, the ears attached, and then the eyes.  OMG!  These bodiless heads had developed a personality!  Now, we couldn’t wait to get to the next stage.  So we stuffed and stitched, made braided tails, and gave them hairdos. 

Liz helped out with the embellishments, like adorning the horn with some bling.  Every unicorn should have some bling!  After all, it is a magical creature.  I must admit, ours do not look quite like the original, but they are so-o-o-o cute, goofy, but cute!


So, you may be wondering, why I bother making these fantastic beasts when it seems that I complain about making them. 

Scroll down and see.


Need I say more?

Maybe I should dig out that Teddy Bear Kit after all.  It shouldn’t take very long.

Wednesday, 4 April 2018

The Perfect Sweater Project


The Perfect Sweater Project 

Sometimes, the heavens open and the stars align in the creation of the perfect sweater!

When I first saw my friend Liz wearing her St. Brigid sweater, by Alice Starmore, I knew I had to make this for myself.  The cable detail, the texture, and the cabled neckline just called out to me. 

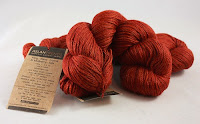
Determined to use my stash whenever possible, I went diving through the bags, totes, and cubicles and eventually found some King Baby Llama & Mulberry Silk by Aslan Trends.  This luxurious yarn is comprised of 70% Llama and 30% Mulberry Silk.  The pattern called for a DK weight, and technically, my prized yarn is considered a Worsted weight.  To be sure, I consulted with Linda & Liz at my LYS.  It was agreed that this yarn knits up more like a DK, and is best knit with a smaller needle due to the tendency for Llama and Silk to grow with wearing.   A quick yardage calculation to be sure that there was enough yarn, then off to swatch.  Yes, I said swatch; (when it comes to knitting sweaters, I swatch; to make sure that the garment will fit when complete) and I decided to use a 3.75mm needle to achieve the correct gauge.

I don’t know when I have enjoyed knitting any project more than this sweater.  It was addictive.  The yarn was absolutely lovely to work with, and it glided over my needles, just so.  I had to stop and admire my work every few rows, just to take in the loveliness as the cable patterns started to emerge.  Good thing I did …. Best way to catch a cable leaning right when it should have been left.  If you catch it soon enough, it’s fairly easy to correct.  Just get out the crochet hook and fix it right away.  


The pattern has a 22 row repeat, so I set this as a milestone for myself on every sitting.  Once complete, I would lay it out and admire it for a few minutes, then put it away for another time.  Sometimes, I had to force myself to put it away as it was very addictive, but I knew that it was prone for mistakes if I worked it until I was tired.  Knitting backwards (aka tinking) is not a productive use of one’s time.

Oddly enough, the pattern called for 9 repeats of the cable pattern for the body, regardless of size.  My friend Liz, is about 5’6/7” and I am a mere 5’ ¾” (not quite 5’1”).  Since Liz has a good 6” on me, we agreed that I would do 8 pattern repeats.  This was taken into consideration when we verified the yarn requirements.

With the back completed and nearing completion of the front, I started to become very anxious that I would not have enough yarn to finish the project.  My anxiety was growing with every row.  Oh no, what if I don’t have enough to do the beautiful cabled neckline?  The cable is extremely important.  I must source more yarn!  So I wrote to every yarn shop in the GTA, asking if anyone had this yarn in my colour.  I wasn’t concerned about the dye lot; I just wanted a skein of the yarn. Every response back, “Sorry, we do not carry that yarn”.  Now what.

Option one - see who has it stashed on Ravelry and ask it they will part with one skein.  That takes too much time.  By the time people see they have a message and respond, my anxiety will have reached critical mass.   

Option two – surf the web for someone selling the yarn, anywhere.  Found it! $19.50 / skein plus $16 shipping.  Expensive option considering I paid $10/skein in a clearance bin.  Keep it in the back of my mind, just in case nothing else works out.

Option three – check the Canadian Distributor’s website to see if they have any left.  Bingo!  They have a limited supply, but they have it.  Appeal to my LYS … Linda, can you please order it for me?  Yes!  My anxiety wanes and I am back to blissful knitting.  

On to the sleeves.  The pattern called for 6 repeats of the pattern, regardless of size.  Interestingly enough, unlike the body, the sleeves work for my stature, although my arm span is wider than my height.  Not by much, but the pattern works.  To my surprise, the sleeves did not take as much yarn as expected.  With both sleeves and saddles complete, time to sew together all the pieces to start the glorious neckline.

I was anticipating that sewing the cable around the neckline would be somewhat painful, but not so.  It stitched together quite easily; a little fussy, but one shot and it was done.  Now, time to pick up the stitches for the neck.  (btw, still working with the original yarn.)

The game of Yarn Chicken ensues.  Will I have enough to complete the 1x1 rib?  Do I need to go into the new skein for the cast off row?  I hate doing that.  Three rows left, then two, now one … cast off.
Eureka, with two yards left to spare!


The moral of this story is, make sure you have more than enough yarn before starting that “must have, love it!” project.  On everyday projects, we make do, substituting other yarns or colours to complete the project.  When it comes to that special project, it’s important to complete it as envisioned.  Also, check your work often.  Complex cables can be prone to mistakes.  If you catch them early, they can be corrected without undoing all your lovely work.  If not, well, you get your money’s worth out the yarn by tearing back and re-knitting, but none of us like to do that.

Final note, although I did not need the extra yarn that Linda ordered for me, my pal Vivian purchased it when I told her how much I enjoyed knitting with it.  It seems that it is not available any more, but I would buy it again in a heartbeat.